Tuesday, June 30, 2009
I love you like a mouse loves cheese!
Monday, June 29, 2009
Anniversary Cards!
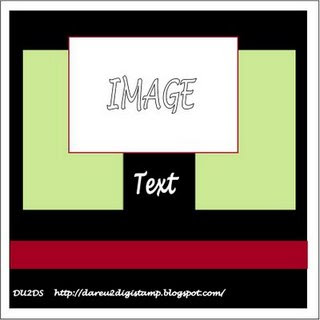
Ok so I went a bit overboard for this challenge, but I had a lot of fun! Here is the sketch for this week's Dare U 2 Digi Stamp challenge.
 They were all made using My Mind's Eye Card bases.
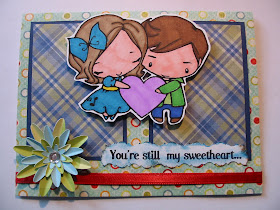 This one has Anya & Ian from the Greeting Farm. The inside says "after all these years. Happy Anniversary!"
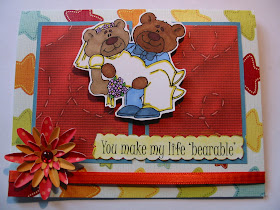 This is a digi from Dusin Pike. The inside says: "Thank you for 'bear'ing with me all these years! Happy Anniversary".
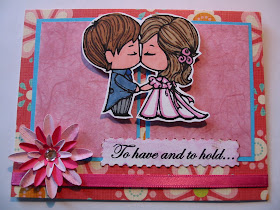 This is another Anya & Ian stamp from the Greeting Farm. The inside says: "for many years more. Happy Anniversary".
 They were all made using My Mind's Eye Card bases.
Thursday, June 25, 2009
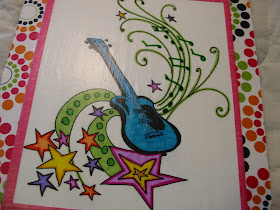
A Rockin' Teacher's Gift~ Kid's Crafty Project
Hey all! This week I decided to step outside the box. I've been doing a lot of cards, but not many other projects. So I decided to drag out my decoupage! I love decoupage. I learned how to do it just last year and it can be very addicting. I think my husband was glad when my first bottle ran out, otherwise the whole house would have been covered. LOL.
This is a pic of the backside of the clipboard. I used a digital stamp from Lindsay's Stamp Stuff. Don't forget that Lindsay has a special this month if you buy $10 worth in her store, you get a free card kit!
I created this clipboard for a teacher friend of mine who teaches 2nd grade. This did not take long to create. It could easily be done by a child with some supervision. For younger children, I'd have all the pieces precut to fit the clipboard for them before starting the project. However older children could probably do this on their own. I would say that this would be a great project for a kid to create as a gift for their teacher. What teacher couldn't use a clipboard? This could even be done as a back to school project. Kids could cut things from magazines or old coloring books (and color them). The sky is the limit! I first printed the stamp, colored it with my Bic Mark Its, then I hit it with the blow dryer to set the inks so the glue wouldn't smudge them. I cut my patterned paper to fit the clipboard, then I took a 2" paint brush and swiped a thin layer of glue over one side of the clipboard. Once it was evenly covered, I placed my first sheet of paper on it. I made sure it covered all sides and then smoothed it out (make sure there are no bubbles). I also cut a 2" piece of fushia paper to go acoss the bottom. I wanted the letters to stand out more. I should also mention that I let each layer of glue dry before moving on to the next layer. I also put an extra layer of glue across the letters at the bottom, just in case they try to peel over time. I put decoupage over all surfaces of the paper to make it waterproof, however this is not necessary. If you prefer to be able to feel the texture of the paper, you can skip this step. But it will probably last longer and be more durable if coated in a layer of glue.

Last, but not least, your freebie Thursday! Here is a file to cut out the San Francisco Golden Gate Bridge and title. I created it to work on my MIL's scrapbook of her trip there. Enjoy!
This is a pic of the backside of the clipboard. I used a digital stamp from Lindsay's Stamp Stuff. Don't forget that Lindsay has a special this month if you buy $10 worth in her store, you get a free card kit!
I created this clipboard for a teacher friend of mine who teaches 2nd grade. This did not take long to create. It could easily be done by a child with some supervision. For younger children, I'd have all the pieces precut to fit the clipboard for them before starting the project. However older children could probably do this on their own. I would say that this would be a great project for a kid to create as a gift for their teacher. What teacher couldn't use a clipboard? This could even be done as a back to school project. Kids could cut things from magazines or old coloring books (and color them). The sky is the limit!
These letters were cut with my Cricut on black cardstock using a free font called Mandingo. The paper is called Celebration by American Paper Crafts.
*********Hidden Freebie Alert************
Once again, Lindsay has designed a special stamp for one of us on the design team. On Thursdays, one lucky DT member will have her special stamp available to download free for a whole week. Click on the links below to check out the cool Design Team Blogs and see who has the free stamp this week!
Melissa
Janet
Mitzi
Kim
Lisa
Margie
Katt
Michelle
Row
Olena
Tracey
Last, but not least, your freebie Thursday! Here is a file to cut out the San Francisco Golden Gate Bridge and title. I created it to work on my MIL's scrapbook of her trip there. Enjoy!
Tuesday, June 23, 2009
52 Sketches, 52 Weeks
Here is a scrapbook LO that did for 52 Sketches, 52 Weeks. I'm not entirely pleased with the way it turned out. I think the buttons and lace look a little cheesy and amateur. It was not the look I was going for. Oh well. At least the pics look nice!
Do Not Meddle in Affairs with Dragons...
Here is a card I made for my friend Megan's birthday. It's not until September, but I saw this same sentiment on a card on someone's blog (forgive me, I forget who) and I just had to use it for her card! She has a quirky sense of humor, just like me. I used a grouchy looking dragon from Dustin Pike. I say grouchy, bc he doesn't really look all that dangerous to me, he just looks like he's trying to scare you. LOL. I know some men like that. The card base is by My Mind's Eye. I used lots of brown chalk to make it look dirty or burnt. The only thing I acutally did burn is the brown cardstock on the front and inside of the card. Like I've said before, I'm a bit of a pyromaniac like my hubby, so I had fun making this card. The heat also makes the cardstock bow out a bit so it looks more 3D.
 I should mention as well, I figured out a little trick on my own today for how to attach this ribbon to the card. As you can see the ribbon disappears on the left side of the card. I used my Exacto blade to cut a slit in the fold of the card. That way I had no loose ends, I could slide it inside and hide it. And you can see below how it comes inside and I've tucked it under the cardstock.
Pregnant Bella & her Fella Card
I'm so jealous of Bella! I'll have to admit, I've got baby fever something awful! My hubby is about to lose his mind because all I talk about is having another baby. To be honest, I didn't even need to make a pregnancy card, but I just loved the image so much and my jealousy took over, so I did it anyways. I love how Bella and her Fella have a matching color scheme. I know a few couples who do this and it is hilarous! The card base is by My Mind's Eye. The Bella stamp can be found here.
The 3D flower was created using a simple flower svg that I cut out 4 times. I used 4 different sizes and did 2 of the sizes on patterned paper and 2 on cardstock. Then I gently folded the petals to make it 3D and popped a brad through the center! Easy!
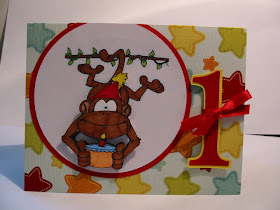
Crazy Monkey 1 Year Old Bday Card
Hi there! Hope you're having a wonderful Tuesday! I just thought I'd share with you a card that I made a week or so ago for someone who requested a custom card on Ebay. It features a crazy monkey created by Dustin Pike. It is for a child turning 1 year old! I just love all of the bright colors on the card! The card base is by My Mind's Eye. The #1 was cut using the Plantin Schoolbook Cartridge on my Circut. I used a little ribbon to tie around it to give it some personality. The inside says: "Every year you grow, you'll just become more fun to know!".
Friday, June 19, 2009
Your Blog Makes Us Smile Award!
Thursday, June 18, 2009
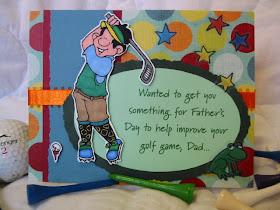
Funny Father's Day Card for a Golfer
Hey everyone! Here is a card that I made for my hubby for Father's Day. My hubby loves to play golf, but unfortunately he's not that good at it. I used the Friday Sketchers Sketch for this card.
Here's a tip for ya! I was fresh out of ideas for what to make the card about. I went to Dollar Tree and looked through their cards, I found one about golf and it had this sentiment. I took a picture of the outside/inside of the card and later came home and made my own with the same sentiment! So don't go thinking I was clever enough to come up with this one on my own. LOL!
The digi stamp that I used is actually a free clip art image from Phillip Martin. It was already colored, but I played around with it and made it black and white so that I could color it on my own. And here you have it. If you'd like the black and white version, it's a freebie: Golfer Digi
Wednesday, June 17, 2009
Hoot! Another Stamp Scavenger Hunt...
Time for another thursday digi stamp freebie scavenger hunt! This card is for my DMIL's birthday next week. She's a big fan of anything concerning owls. You should see her bedroom. Anyways, I created this charming card using Lindsay's Owl stamp. It is only $1.00! And don't forget, until the end of June, Lindsay is giving away a free card kit for every $10 you spend in the store!
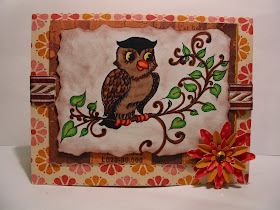
 This 3-D flower was created using a flower that I had created for an earlier blog post freebie. It is the flower on the pedastel, without the pedastel of course. To make it 3-D I just used the dull side of my Exacto blade and made a bend in each petal. Then I glued them one on top of the other and added a gem. Easy as pie! To create a bunch of these cute flowers at one time, I've included a SCUT file as this week's freebie. There are two files. One is to be printed on patterned paper and the other on solid cardstock. It will make about 32 flowers. I just cut them out, then put them all in a ziplock bag, then while I'm sitting watching tv, I grab the bag, my exacto blade and glue and start assembling. A tip when glueing them together, use the opposite end of your exacto pen (or a pencil eraser) to push down in the center of each layer to glue them together. I find that putting it on a mouse pad or a couch cushion (as is the case while watching tv) it helps to keep the 3D effect when pushing with the eraser or end of the exacto pen.
3D Flower Scut File1 3D Flower Scut File 2
3D Flower Scut File1 3D Flower Scut File 2
Once again, Lindsay has designed a special stamp for one of us on the design team. On Thursdays, one lucky DT member will have her special stamp available to download free for a whole week. Click on the links below to check out the cool Design Team Blogs and see who has the free stamp this week!
Oh Brave Knight!
Here is another precious stamp from Dustin Pike. It was actually a freebie. Here is the sentiment if you'd like to use it yourself. You're my Hero. The background is a weird green patterned paper. I thought it looked kinda like storybook hills. haha. The gems were clear and I colored them purple to match!
Tuesday, June 16, 2009
Hey Cowboy
Don't you just love stamps from the Greeting Farm? I love Ian and Anya. Here is the cowboy Ian stamp. He looks so shy! I love cowboys anyways. The stamp was colored using coloring pencils, the paisleys were cut out from a piece of patterned paper that I got from the dollar tree. The striped paper is from Lindsay's Patriotic Card Kit.
Monday, June 15, 2009
Your friendship is like a balloon...
Once again I have a card for you. I think I'm going to set a personal record in number of posts in a week. This is once again another Dustin Pike image. I think I just went crazy printing all of his images off and I was in the mood to color that day. And again, I'm going to share with you the quote that I created in Publisher. It is saved in jpeg format. Your friendship is like a balloon

Sunday, June 14, 2009
Sleepy Bear Card
Hello again! Hope you're having a wonderful day! Time for another card! This one was created using a Dusin Pike stamp. I just love his images. They are all so cute!
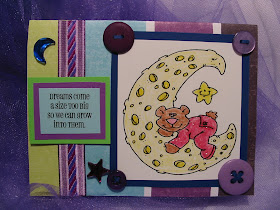
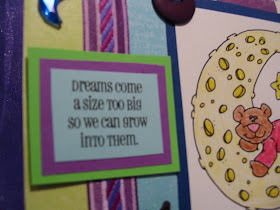
Here is another quote that I created to go on the card. You can download it here to use on your projects. It is in jpeg format. Dreams Quote
As always, please comment if you download! I love to hear from you!
Here is another quote that I created to go on the card. You can download it here to use on your projects. It is in jpeg format. Dreams Quote
As always, please comment if you download! I love to hear from you!
Saturday, June 13, 2009
Flowers & Turtles can be friends...
Ok here's another card! I made this one using a couple of coloring book pages. Here is the flower. I couldn't find the turtle to share, sorry. The gemstones that I used were originally clear, but I used my Bic Mark It's to make them green! Just a little trick I learned from Lindsay. The background paper is a bright yellow daisy paper from Hobby Lobby.
I got creative with my Microsoft Publisher and created this cute sentiment for the card. I saved it as a jpeg so that you can download it and use it on a card if you like. Time Spent with Friends
Friday, June 12, 2009
A Wedding Card Tutorial
Hello all! I was a busy girl yesterday. I made 6 cards! I did it in just a couple of hours too. This first one took the longest though. I'll tell you what made it go quickly. I had all of my digi stamps printed, colored and cut out. One night I was bored, but not feeling crafty, so I cut out cards and patterned papers that I wanted to use for each stamp, but I just put them aside and never finished them. So yesterday, the crafty bug hit. I got to work on those cards! I'm not going to share them all today, but I'll post one each day for the next 5 days. So keep a look out!
This card was created using several SVG files from SCUT Files.com. Most of them were freebies. I saw that yesterday they had a tutorial for this card posted and I decided to give it a try. I don't like mine as well as Mary's, but I'm still proud of it. It is the first time I've ever done 3D flowers like these though. Here is a link to the tutorial.
This card was created using several SVG files from SCUT Files.com. Most of them were freebies. I saw that yesterday they had a tutorial for this card posted and I decided to give it a try. I don't like mine as well as Mary's, but I'm still proud of it. It is the first time I've ever done 3D flowers like these though. Here is a link to the tutorial.
Thursday, June 11, 2009
My Country Tis of Thee....
Haha! I bet you have that song stuck in your head now, just like me!
Hey there everyone! It's time for another freebie! This week, Lindsay's Stamp Stuff Design Team had a Patriotic theme going on. So I used Lindsay's Patriotic Card Kit and a few of her stamps to design this card. I used the Jean Pocket Stamp, Flag Bunting, and Patriotic Heart w/Buttons. All of them are only $1.00 each! The tiny little star button is from the Kit, but I put a coat of clear nail polish over it to make it stand out and shine. I wanted it to appear like a metal button. It worked pretty well! It's hard to see the shine in the picture though. To get the denim look on the pocket, I just used denim patterned paper to print it on!
This beautiful and inspirational quote is a part of the Patriotic Card Kit.
*********Hidden Freebie Alert************
As I said last week, Lindsay is designing a special stamp for each of us on the design team. On Thursdays, one lucky DT member will have her special stamp available to download free for a whole week. Click on the links below to check out the cool Design Team Blogs and see who has the free stamp this week!
The first card is a Doodle Daisy digi stamp from LSS. I printed it out a while back and colored it with my Bic Mark Its, but I just left it in my stash until now. I had some creative energy to burn, so I pulled it out and this is what I came up with. The Hello at the bottom is this week's Thursday Freebie.
Tuesday, June 9, 2009
I Won 3rd Place!!
Thank you so much to everyone's support and votes! I won 3rd place in the Cutest Craft Contest at The Original Scrapbox! I won a ScrapMaBob! I know you're probably wondering what the crap that is, so here is a picture:
I've never heard of it before, but apparently it hooks to your desk and holds your drink and has a pouch to put scrap stuff or trash in. Does anyone have one of these? I was wondering what you thought of it? Anyways, I was disappointed that I didn't win the awesome desk, but I'm still glad i won this! Who doesn't like something for free right?
Monday, June 8, 2009
A Camping We Will Go...
Well I am very proud of this card. It was my hubby's 26th birthday last Saturday. For a little getaway, we took him camping, so this card is very appropriate for that. All of the images used are from Dustin Pike. My husband told me his birthday card better be "out of this world". In years past, I have always purchased cards, but this year I have begun making them and I'm always showing them to him. So his expectations were set high. However, after he saw the card, he was VERY impressed. He loved it!
 It is hard to tell, but most of the card is 3-D. The Happy Bday banner is a sticker.
 The gas can was a from a coloring page image that I found on Google. The story below was 100% made up by me, but if you'd like to use it, you're welcome to it!

 The reason I told a story was because I could not seem to come up with the appropriate caption. My husband is very much a pyromaniac. Everytime we go camping, he thinks he needs to put some lighter fluid or gasoline on the fire before lighting it. Which 99% of the time is totally unnecessary. So it is a joke in our family.
Thursday, June 4, 2009
Recycling, Hidden Freebies & Card Kits!
Today's post has a lot of different elements. First of all the Lindsay's Stamp Stuff design team went with a Recycling theme this week, so we all added some sort of "recycled" element to our projects.
Ok on to the cards! I have used Lindsay's great Black and White Card Kit. It is only $2.00 in her store! I know you're wondering where the black and white elements are, but I have altered them quite a bit. I loved the black and white pattern on the paper, but I wanted a punch of color, so I used my Bic Mark its to add some color so that it would match the rest of the card. I also used some chalks to give the sentiment some color as well. It already had a black and white aged look around the edges, I just added some pink/purple chalk. The digital stamp that I used is available in Lindsay's store for only $1.00 HERE.
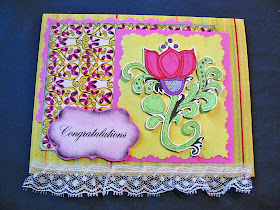 The recycled portion of the card is the lace along the bottom. I attached it using double stick tape. It is recycled because I got it from a local thrift store. It was someone else's cast off and I knew it had potential! I should also mention that the card base is by My Mind's Eye.
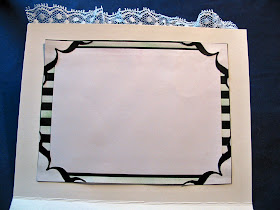
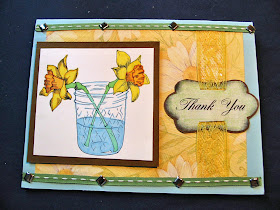
The next card features another digital stamp by LSS. It can be found here for only $1.00. The yellow lace is also recycled from a thrift store! The sentiment on the front is from the black and white card kit as well, I just gave it some green chalking.
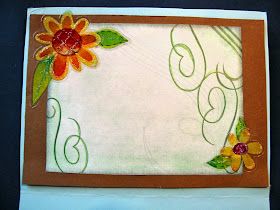
 This beautiful swirly background is also a part of the same card kit I mentioned before. I just added some green chalk to it and traced the swirls with a green colored pencil. The stickers are by Special Moments (@ Dollar Tree).
 If you've never tried a card kit or a digital stamp, go to Lindsay's blog to get a freebie so you can try before you buy! I should also mention that Lindsay is offering a bargain in the month of June. For every $10 you spend in the store, you get a free card kit! Not to mention, by purchasing items in LSS, the Shophandmade website pledges to protect 25 sq feet of rainforest for every purchase made at any of the stores in the network to offset the pollution done by shipping and since there is no shipping with the digistuff (it's all emailed) it's like being extra green!
Ok on to the cards! I have used Lindsay's great Black and White Card Kit. It is only $2.00 in her store! I know you're wondering where the black and white elements are, but I have altered them quite a bit. I loved the black and white pattern on the paper, but I wanted a punch of color, so I used my Bic Mark its to add some color so that it would match the rest of the card. I also used some chalks to give the sentiment some color as well. It already had a black and white aged look around the edges, I just added some pink/purple chalk. The digital stamp that I used is available in Lindsay's store for only $1.00 HERE.
The next card features another digital stamp by LSS. It can be found here for only $1.00. The yellow lace is also recycled from a thrift store! The sentiment on the front is from the black and white card kit as well, I just gave it some green chalking.
*********Hidden Freebie Alert************
Lindsay is designing a special stamp for each of us on the design team. On Thursdays, one lucky DT member will have her special stamp available to download free for a whole week. Click on the links below to check out the cool Design Team Blogs and see who has the free stamp this week!
Tuesday, June 2, 2009
You've got a friend...
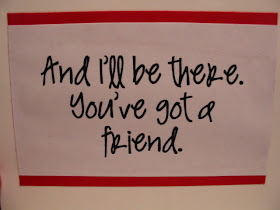
Here is a card that I made for 365 Cards's Challenge Blog #93: Call Me. I was supposed to either use the sentiment: Call Me or use a phone of some sort on the card. I could not resist using this sentiment. I sang this song "You've got a friend" about a million times in choir class in middle school and it has stuck with me. So I included part of the chorus as my sentiment.
The phone is an svg file that I got from Stacy's SVG Files, but I separated it and changed it up a bit so that I could cut it out in 3 different color pieces to make it look like this. Here is my version of the file: Telephone SVG
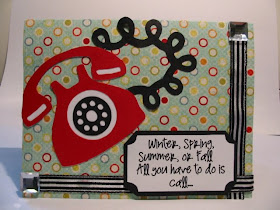
The phone is an svg file that I got from Stacy's SVG Files, but I separated it and changed it up a bit so that I could cut it out in 3 different color pieces to make it look like this. Here is my version of the file: Telephone SVG
