Tuesday, December 13, 2011

10% OFF and guaranteed arrival for Christmas until Dec 16th!


Just a few more days to take advantage of this deal! Order any of these preselected LAST MINUTE GIFT IDEAS and get 10% off, plus it's guaranteed to arrive before Christmas! If you have any questions, feel free to ask. If not, you can shop here.


Here is another look at the handstamped charms that are featured below.


Ready to start shopping? Go here!
Be sure to associate your order with "Last Minute Shopping Open House".

Tuesday, November 29, 2011

Isle of Agape Necklaces

I just wanted to take a moment and show you these ADORABLE necklaces that I ordered for my neices. They are from a little etsy shop called Isle of Agape. (btw, I'm not being compensated to share this with you, I just love them that much!). I was so pleased with the quality and professionalism of the shop that I wanted to give her a little shout out on my blog!
These precious little necklaces were only $10 each!! My neices are going to love them!


Wednesday, November 23, 2011

Uppercase Living BLACK FRIDAY SALE 50% select items!


Get Ready. Get Set. Get Inspired. Fighting crowds and standing in lines isn’t fun for anyone. Instead, shop our Black Friday event for a more inspiring experience! Between 5:00 a.m. and 10:00 a.m. MT, you can get selections of our larger-than-life Grande Format designs and our Playful Collection of Blume Jewelry for 50% off! See photos below for some of our products that are eligible for the sale!


All you have to do is place an order with us on Black Friday (November 25), and we'll include this adorable sheet of Holiday vinyl with your order!

Want to join others in living a life inspired? November is your month! From now until November 30, new Demonstrators can join UL for only $49. This price applies to each of our Starter Kits—Uppercase Complete, Expressions, or Blume—for a savings of up to $250 at sign up.


You get $150 in free product credit with your kit!
You can earn 25% or more in commission!
You get more than $400 in jewelry with your kit! (who wouldn't want that?!)
You only have to sell $600 a year to remain a demo! (so easy!)

You can earn rewards through sales and work your way towards:
-A beautiful necklace valued at $100+
-A Spa Gift
-A Girl's Trip to NYC with other demos
-A Mediterranean cruise!

Not to mention, you get to work with some of the most kind and inspiring ladies across the country. We are a very giving and sharing group of people. We have a FB page where we share ideas and photos and support for one another. I have never seen another company like this one before! We truly are a family.

That is why I would love for you to join my team! I am here to answer any questions you may have and help you start your business! You will not regret it!


Friday, October 28, 2011

Whoa Doggie! What a DEAL!!

Holy Cow! What a deal!

Check out what Uppercase Living just announced!


It’s a great time to be part of an inspiring company! Beginning November 1 at noon MT through November 30, new Demonstrators can join UL for only $49. This price applies to each of our Starter Kits—Uppercase Complete, Expressions, or Blume—for a savings of up to $250 at sign up.

Once you join, you’ll have the entire UpStart period (90 days!) to keep your sign-up savings. Hit your UpStart and you won’t have to pay the remainder on the price of your Starter Kit—you can earn it by achieving all the levels in the UpStart Program.* The best part is the UpStart Program awards you with $100 in cash when you hold your first Open House within 30 days, and submit $1200 in your first 90 days. So, you’ll receive an amazing deal on your starter kit AND have $100 in your pocket!

**If you're interested, but worried about meeting your upstart, don't worry, I met mine with no problems. I can help you every step of the way! This is a great time to join! People are starting to do some shopping!
Email me if you have any questions! tamara_bennett7@hotmail.com

or go here to sign up:


Wednesday, October 12, 2011

Cheap & Creepy Decor pt.3

I've finally gotten around to posting about the rest of my halloween decor! Here is a pumpkin that my mom bought on clearance last year after halloween. It was a sad and boring orange. Until I painted it a base coat of hunter green and then went over it with some green Extreme Glitter Paint from Michaels. I love that stuff! It is so pretty!! This picture really doesn't do it justice.

And now for my pride and joy...
I bought this lovely shelf at HL half off! I got it for $20. I was dying to have some sort of space in my house that acted as a mantle of sorts. I needed place to decorate in other words.
I purchased the "creepy fabric" at walmart for about $4 or so. Yes that is really the name of it. "Creepy Fabric". LOL.
I got the grey skull at our local thrift store for a buck and the pumpkins on the left are fake from the Dollar Tree. The bumpy squash is real. It is from a local farmer down the road.


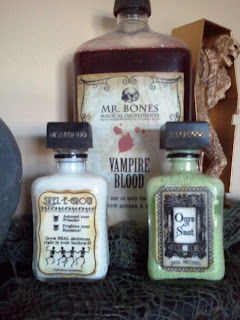
The gruesome potion bottles are all made by me. So easy! The tall one is an old bottle of soap that I poured water, red food coloring and a little bit of coffee in. Why the coffee? It darkens it up to look more like blood.
The smaller bottles are tiny liquor bottles. I don't drink, but I found these at a wedding we went to recently. Another guest left them on the table after they were empty, so I snatched them up!


The label for the vampire blood can be found here. The Ogre snot is here and the Skele-grow is a label made by my friend Lindsay the Frugal Crafter. See the picture below for a better look at her labels!


Friday, September 30, 2011

More cheap & creepy decor!

What's a girl to do when she's stuck at home on a friday night with two little boys and nowhere to go? Make the house creepier! Tomorrow is October 1st! I couldn't resist pulling out my cheap halloween decor that I bought from the Dollar Tree back in August. LOL. yes August.
In my town, if you don't grab it now, it won't be there later. Esp at the DT!
These creepy spiders were 2/$1.00 at the dt. I attached them using scrapbooking pop dots.


Then I decided to go gather some broken branches from the woods and spray paint them black. I then spray painted an old coffee can black and added some sand in the bottom. Then I stuck my painted branches in it and added some rocks to keep it all in place. Then I spray painted the rocks on top black as well.

When I got it inside, I added 3 of these crows. I got them for $1.00 each at DT. I think Michael's has them too, but probably not for a dollar. I also had some spanish moss laying around and added it too!


My kids love it!!

Monday, September 26, 2011

Cheap & Easy Halloween Decor + SVG Freebies!

Things are getting creepy around here! I decided it was close enough to Halloween to start decorating! I love halloween and up until now, we've always lived in a tiny apartment or trailer. Not this year! We now own a 5 bedroom house! So I have plenty of room to decorate! Just wait for Christmas! LOL.

I got out some black vinyl and cut these creepy spiders in all sorts of sizes. Check out all the places they are creeping around!


I had seen this idea here. If you don't own a cricut (which really speeds up the process). She has a template on her blog for cutting them out. As soon as I put the first one up, my son says "ohhh Awesome mom!". Those words made it all worth while. Makes me feel like by doing little things like this I'm building memories for my children. Hopefully they look back and remember how cool mom decorated the house on halloween and really brought the season to life!


If you do own a cricut and have SCAL, you can use the files below to create your own creepy fun!


Saturday, September 17, 2011

Girlie Birthday Card

Don't you just love it when you're getting ready to go to a birthday party, the gift is wrapped at the last minute and you realize you have no card?
Well that's what happened yesterday. I had about 20 minutes to spare before I had to leave and I just put the finishing touches on the tissue paper in the gift bag (in otherwords, stuffed it in). LOL. I realized I needed a card. I ran to my craft room, which was a WRECK. I really need to clean it up.
I dug through a drawer of junk that I sometimes throw stamped images into that haven't been colored yet. I found this little girlie. She was perfect for a 6 year old's bday!
I colored her with my copics really quickly (I haven't used copics in months). I'm surprised I remembered how. I added some distressing inks to the edges and it made her *Pop*!

Quick, easy & simple.
This card qualifies for the challenges at Creatalicious, Cute Card Thursday.

Thursday, September 15, 2011

My Paula Deen Dining Table Look-a-Like!

A few months ago I had no idea that Paula Deen even had her name stamped on any furniture, then one day I went held an Uppercase Living open house at a lady's home and she had the most gorgeous dining table. I knew I would never be able to afford one. So I kept my eye out for one that looked similar that could be transformed.
Then I came across this huge table on craigslist for $300. I talked her down to $250, since 2 of the 8 chairs needed repair. I took the broken chairs to a friend who makes cabinetry and he repaired them for me for free. I was going to pay him, but he refused, so I made him a chocolate pie as a thank you.


I took the chairs outiside to primer them. I used Valspar white primer.


I them brought them inside and sat them one by one on top of the dining table and hand painted them with a brush. *Oh my this was exhausting. Each one took 2 hours to do 2 coats.
Thankfully, after the first 4 chairs were done, a friend let me borrow a paint sprayer to finish the job. Let me tell you, it was a lifesaver. I was losing motivation to get this monstrous job finished, but once I got to using the paint sprayer, holy moly was it easier! I wish I'd used it from the beginning. I'm told that the one I used is about $100. Totally worth it. I'm going to be asking Santa for one for Christmas.
Well after everything had a good paint covering, I had one last problem, 4 chairs had been painted by brush, 4 by sprayer, so the texture they had wasn't quite the same. Not that the sprayer gave it a bad texture, it just didn't match. So I went over the ones that had been sprayed lightly with a brush to give them the same texture.

The next step was to add some distressing. *I know, Paula's tables aren't that distressed. But I have 2 little boys who WILL distress them if I don't. So to prevent future stressing over paint touchups, I intentionally scuffed them up. 


If you'll notice in the close up of the next photo, Paula's table has a little bit of tea stain glazing on it.
I attempted to recreate this by mixing my own clear glaze with a latex paint called "fried dough". LOL. I love that name. It turned out quite nice!


Finally, I put a good coat of polyurethane on top of the table, so spills would be easier to clean up, not to mention it prevents glasses from leaving water rings.

 So here is my version of a Paula Deen Linen Dining Table set!


 And here is the real thing!